We’ve received a lot of questions about how we calibrate the Sennheiser HD 600 headphones for mastering. In this article, we’ll walk you through the process step by step and show you the specific settings we use. Whether you’re mastering, mixing, producing or just want to ensure that your headphones are performing at their best, this post is for you.
The problems with HD 600
The Sennheiser HD 600 headphones already have a nice sound even without EQ correction, but to get the most out of them, especially when using them for music production, we recommend calibrating them for a flat frequency response. This ensures that all frequencies are reproduced accurately and evenly, resulting in a more natural and balanced sound.
The HD 600 headphones have three main drawbacks in our view:
- They don’t have enough deep bass, although it is present.
- The highs are somewhat subdued.
- There are some resonances in the upper mids and lower highs.
How to improve the sound
To fix these issues, you can use a correction plugin like Sonarworks Sound ID or an equalizer. We use both together. The default correction curve for HD 600 headphones in Sonarworks works well and improves the sound a lot in our opinion. Note that we are using the older Reference 4 plugin, but the newer SoundID Reference plugin offers the same features.
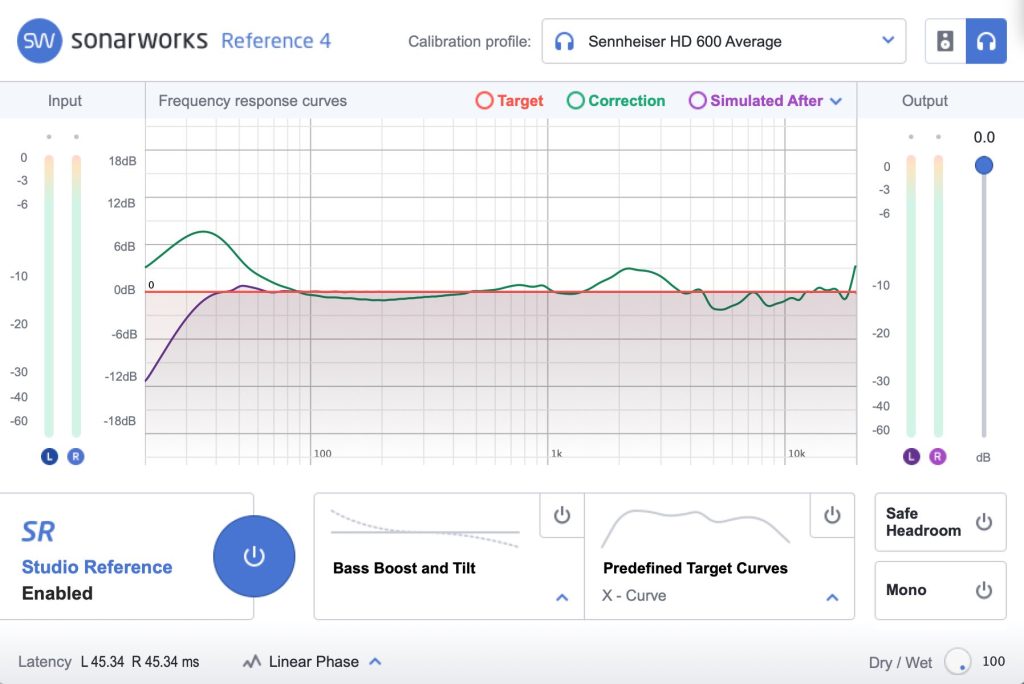
As we can see here, there is a significant increase around 35 Hz, a boost around 2 kHz, and dips at around 5 kHz and 7 kHz. This addresses two of the main issues: the weak low end and the upper mid resonances. However, in our opinion, a little more work is needed, so we add an additional EQ after Sonarworks.
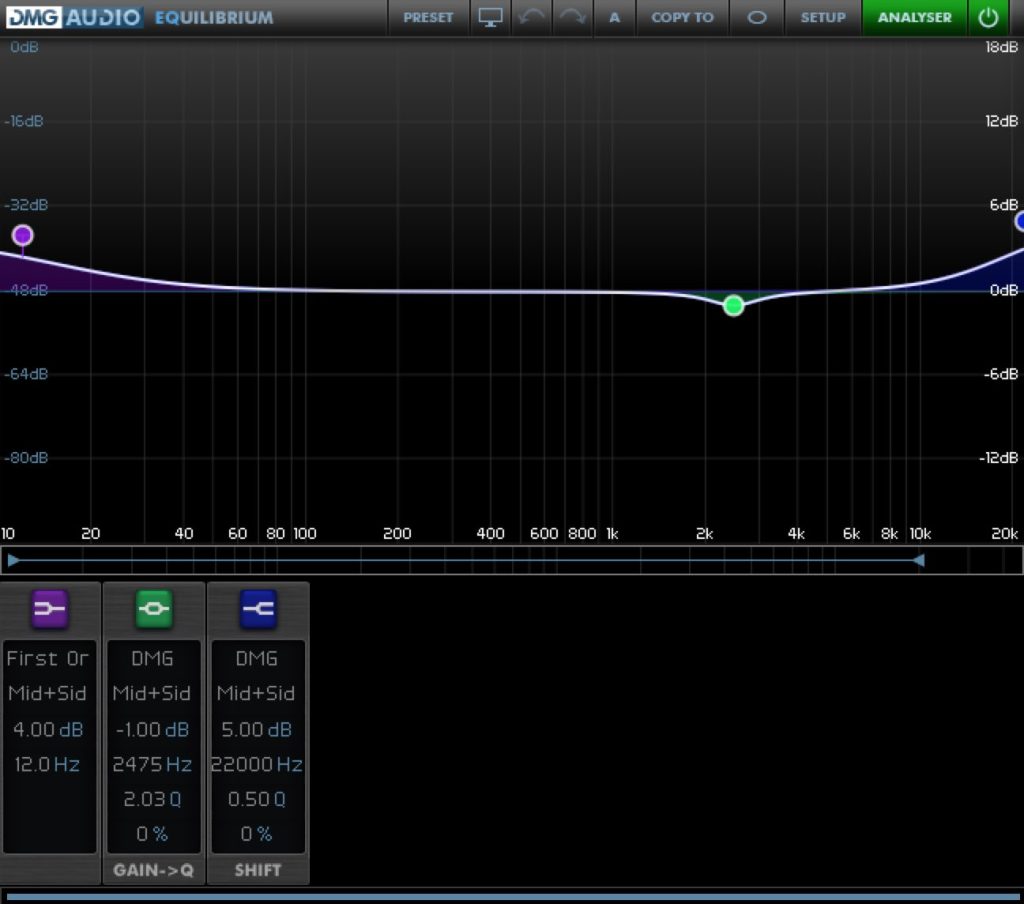
This EQ further enhances the sub-bass and adds more high-end. It also reduces the boost at 2-3 kHz made by Sonarworks Reference 4, which we feel is a bit too strong.
We determined these settings by comparing the sound in the headphones to our trusted speaker setup (B&W 802N) in our previous mastering room. We used both speakers and headphones in parallel for almost a year before transitioning to using headphones exclusively.
The complete monitoring chain
The EQ correction is done in the the final two plugins in the chain we use for monitoring. In total, we use four plugins:
- A gain plugin set to -10dB
- GoodHertz CanOpener
- Sonarworks Reference 4
- DMG Audio Equilibrium
The gain plugin is used to create headroom for the added bass. You can also set this using the output gain in the Sonarworks plugin. However, we prefer to have it as a separate plugin so that we can bypass any of the other plugins without significant level changes.
The second plugin is CanOpener from GoodHertz. This is a cross-feed plugin that allows us to hear the signal as if it were played through speakers. For more information, see our article on mastering in headphones.
Where to place the plugins
You have several options for where to place these plugins:
- Using a system-wide plugin host: This allows you to apply the plugin to any audio being played on your system. Examples include Equalizer APO for Windows or Soundsource for Mac. The advantage of this method is that you can apply the plugin to audio from any application.
- Inside the monitoring section of your DAW: If your digital audio workstation has a monitoring section where you can add plugins, this can be a good solution. For example, Reaper has a Monitor FX chain where you can add plugins that only affect the playback and not the exported or rendered files. The disadvantage of this method is that audio from other applications will not have the correction applied.
- On the master bus in your DAW: This is a less ideal solution, but it can still be useful. Simply add the correction plugins on the master bus in your DAW, after any other effects you may have. The drawback of this method is that you need to remember to bypass all monitoring plugins before exporting anything from your DAW, or the exported files will also have the monitor processing applied.
Use a good amplifier
Make sure to also use a good headphone amplifier. The HD 600 headphones have high impedance and require a strong amplifier even without correction. Adding more than 10 dB of extra bass to the signal puts additional strain on the headphone amplifier to deliver enough power. The headphones themselves seem to handle the extra bass without issue though, unless played at a very high volume.
Conclusion
Calibrating headphones for a flat frequency response can be very useful when mastering or working with music and audio in general. It makes it easier to make decisions about tonal balance and to identify resonances.
While our specific settings and techniques may not work for everyone, we hope that this article has provided a helpful guide for those looking to improve the sound of their headphones. Remember that personal preference is an important factor, so be sure to trust your own ears and adjust the settings to find a sound that works for you.
Thanks for the invaluable tips. For my own part, it is good to check through speakers as I sometimes struggle with having a slightly too deep bass that does not come through in the headphones but is heard in a larger monitor system.
Great point! 👍 This is also a situation when a spectrum analyzer can be useful.
Just a little addition to your great explanation:
At least the newer Sound ID it is possible to customize the target curve further, which gets rid of another plugin instance and with that additional latency and possible pre-ringing by another linear phase eq.
Great tip! 👍
Thank you for sharing this amazing information.
Alternatively, is there a set of headphones with a flat frequency response out of the box?